A while ago I showed these toadstools with a promise to explain how I made them. So even though it’s been a while; here is the tutorial 🙂
![Studio Paars - make your own felt and fabric mushrooms with this easy to follow tutorial with lots of clear pictures. You will need: - spelt (wheat) - wool for filling - rice - bits of felt - needle - pencil - siccors - embroidery thread - bits of fabric - a couple of pins (not pictured) [ felt mushroom tutorial ]](https://i0.wp.com/farm7.staticflickr.com/6103/6315657243_92389e201d.jpg?resize=500%2C500&ssl=1)
Note: these aro not toys. I let my boys play with them gently, and the toadstools are ok with that, but they don’t respond well to being tossed around or getting wet or dirty.
What I used to make them:

– some spelt (wheat)
– some wool for filling
– some rice
– some bits of felt
– needle
– pencil
– siccors
– embroidery thread
– some bits of fabric
– a couple of pins (not pictured)
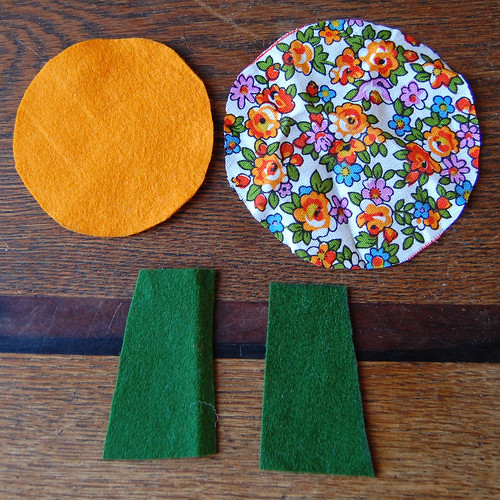
Cut the fabric into a circle, and the felt into a slightly smaller circle. Use cups, bowls, plates, cans etc. to draw around. I used a CD-rom for the fabric and a big roll of tape for the felt. Cut from the other colour of felt (for the stem) shapes similar to these:
Use blanket stitch to sew the two parts of the stem together along the side seams:

First one side:

Then the other:

Cut a circle from the felt that approximately matches the size of the bottom (the wider side) of the stem:

And use blanket stitch to attach it to the stem:

Now fill the stem with rice (I had a packet of rice that was passed the use-by date, but you could also use small pebbles or peas, whatever you happen to have laying around really):

Push it down with the back of a pencil:

And then add a bit of wool to keep everything in place (you could also use a bit of cotton wool or something else):

Now place the felt circle on top of the stem:

And sew it into place:

Using large stitches, make the spores on the bottom of the cap:


Pin the top (fabric) of the cap to the bottom (felt). Because the top is larger you need to gather the fabric a bit as you sew it to the felt:

Using blanket stitch again, sew along the edge of the cap but leave an opening to fill it through later:

Now fill the cap with spelt. I had it laying around and I like the texture and the sound of it, and also that it is very lightweight and doesn’t maken you mushroom fall over (but you could use something else if you prefer):

Close the gap and tadah! Done!

With it’s little friends:


I sometimes link up at these parties:
[foogallery id=”3993″]
[ felt toadstool tutorial ]
Tap the buttons below for more posts on the subject:
24 thoughts on “DIY: sew a felt and fabric toadstool”
I just loved this tutorial. I hope you can read this. Come on over to my linky party at:
http://www.mun-emakingblogs.blogspot.com
GREAT tutorial – and such cute little mushrooms!!
Thanks for linking to a Round Tuit!
Hope you have a fabulous week!
Jill @ Creating my way to Success
http://www.jembellish.blogspot.com/
Bedankt allemaal!
And thanks 🙂
So cute!! I'd love for you to link this project up to Do Something Crafty Friday: http://seevanessacraft.com/2012/09/do-something-crafty-57/
These are so cute! Thank you for sharing. Visiting from Bacon Time. Would love it if you would share this at my Make it Pretty Monday party at The Dedicated House. http://thededicatedhouse.blogspot.com/2012/09/make-it-pretty-monday-week-14.html Hope to see you at the bash! Toodles, Kathryn @TheDedicatedHouse
These are wonderful – they look like something I could sew! (My sewing skills are pretty basic.) Found you via the To Sew With Love Blog Hop!
adorable! I must try this! thanks for the tutorial! 🙂
Amy
http://www.amystebbins.com
really really cute mushrooms. Thank you for sharing the tutorial.
They are so sweet! Thanks for the great tutorial and linking up over at my place! xo Jami
These are so cute! Thanks for sharing this tutorial.
OH! Those are adorable! Thanks for the wonderful tutorial!!
Tania
So cute. Great tutorial.
p
such a beautiful blog….love ur creative works….
Thanks for linking up to my party! I wanted to let you know I picked your link to feature this week! See my post and grab my feature button here http://toastiestudio.blogspot.nl/2012/10/made-monday-41-picks.html
Thanks everyone for all the wonderful comments <3
@Stephanie: Cool! Thanks! I'm off to grab your button now 🙂
So lovely!!! Love the mushrooms!Thanks so much for sharing the great tutorial! I'd love for you to visit my blog.
Happy weekend!
Hugs from Portugal,
Ana Love Craft
http://www.lovecraft2012.blogspot.com
Just stopping by to invite you to My Wednesday Linky party. http://diycraftyprojects.com/2012/11/whatcha-work-up-wednesday-linky-party-7.html
How cute! Great tutorial. Thanks for sharing!
xo-Kimberly {allons-y kimberly}
P.S. I have a giveaway going on right now for some really great hair products (http://www.allonsykimberly.com/2012/11/giveaway-with-flat-iron-experts.html) . Hope you'll stop by!
Great Tutorial, thank you for sharing…
So sweet! I love it! Thanks for sharing the tutorial and for joining us at Inspire Us Thursday!
Adorable, and so happy to “meet” you on craft schooling Sunday, share some more, please!
Thank you Sara, I will!
These are so stinkin cute! It looks like once you make one, it’d be hard to quit. Thanks for sharing your process.
Thanks! Yes it is 🙂